

This Banana Coconut Ice Cream Cake recipe is a sponsored post by Hudsonville, but the text and opinions are all mine. Thank you for supporting brands that make Kylee’s Kitchen possible!
Summer is officially here, which means the season of backyard barbecues and pool parties is in full swing. When it comes to choosing a crowd-pleasing dessert for these occasions, nothing beats a Banana Coconut Ice Cream Cake.
Forget the store-bought varieties—making this frozen treat at home is surprisingly simple and incredibly customizable. Best of all, you can assemble it days in advance and keep it tucked away in the freezer until you’re ready to celebrate. No last-minute baking or decorating required.
To help you master this summer staple, I’m breaking down the kitchen science and sharing the step-by-step blueprint for my absolute favorite flavor combination.
The Great Debate: To Cake or Not to Cake?
Many store-bought ice cream cakes skip the actual cake, opting instead for two layers of ice cream separated by crunchy cookie bits. But I love including a real cake layer. It gives the cake better structure, making it easier to slice and serve. And more importantly, I prefer the balance of flavors and textures.
Why Oil-Based Cakes Work Best
Not all cakes behave the same way once they’re frozen. Cakes made with butter become firm and dense when chilled because butter solidifies at cold temperatures. Oil, on the other hand, remains liquid at remarkably low temperatures, ensuring that your cake layer stays tender and pliable even when frozen.
This recipe is one of the rare occasions in which I recommend using a boxed cake mix shortcut. A standard yellow cake mix relies heavily on oil and emulsifiers, making it the perfect, foolproof canvas for a frozen dessert.
You’ll notice in my recipe that I don’t quite follow the cake mix box ingredients list exactly. I use mashed banana and instant banana pudding to really intensify the banana flavor. Also, I use buttermilk instead of water. The added fat from the buttermilk creates a moister and more tender crumb.
Real Ice Cream Makes a Difference
The most important part of an ice cream cake is, of course, the ice cream. Real ice cream is rich, creamy, and made with high-quality ingredients so it meets the standard to be called ice cream.
If you look closely in the freezer aisle, you may notice products labeled “frozen dairy dessert” sitting right beside the ice cream. While they look similar, frozen dairy desserts contain less milkfat and often rely on extra air and ingredients like oils to achieve their texture. They don’t taste great and also melt quickly.
It is especially important to use a premium product in ice cream cake because it stays firmer longer and tastes better. That’s why I partnered with Hudsonville Ice Cream. For this recipe, I love to use their Toasted Coconut ice cream. But a number of their other flavors, like Peanut Butter Waffle Cone or Salted Caramel, would also work well.
Freeze First, Assemble Later
Clean, sharp layers require patience. Give each section enough time to set in the freezer. I recommend preparing and freezing the cake layers and the ice cream layer the day before you plan to build the ice cream cake.
Prep the Ice Cream Before You Build
One of the biggest challenges when making an ice cream cake is working quickly enough to keep the ice cream from melting while still creating neat, even layers. My favorite trick is to prepare the ice cream layer ahead of time.
Line an 8-inch cake pan with plastic wrap, leaving enough overhang to lift the ice cream out later. Allow a 1.5-quart container of Hudsonville Toasted Coconut ice cream to soften just enough to be spreadable, then press it into the prepared pan. Smooth the top, cover with the overhanging plastic wrap, and return it to the freezer until completely firm, at least 4 hours.
When it’s time to assemble the cake, you’ll have a perfectly shaped ice cream layer ready to go. No spreading, no melting, and no scrambling.

How to Build Banana Coconut Ice Cream Cake
To build this Banana Coconut Ice Cream Cake, I start by placing one cake layer on a cake board set on a serving platter that fits in my freezer. (It’s worth double-checking the fit before you start assembling.)
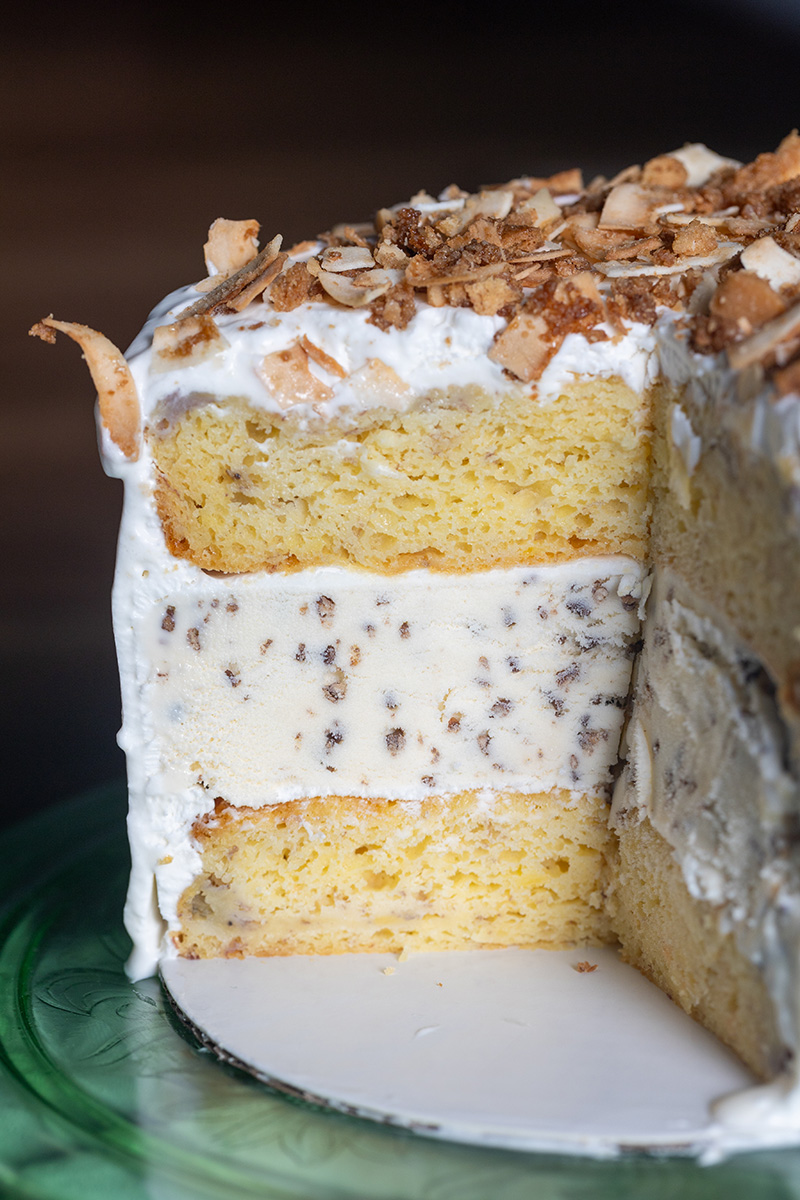
I spread a thin layer of stabilized whipped cream over the cake layer to create a smooth surface, then carefully unmold the frozen ice cream layer and place it on top. Another thin layer of whipped cream helps the second cake layer adhere and keeps the layers neatly stacked.
Once the second cake layer is in place, I frost the entire cake with stabilized whipped cream and return it to the freezer to firm up. Just before serving, I decorate the cake with toasted coconut and graham cracker crumbs for a little crunch and color.
The key to success is keeping every component as cold as possible throughout the process. If at any point the ice cream begins to soften, simply return the cake to the freezer for 10 to 15 minutes before continuing.
The Easiest Frosting
My favorite way to finish an ice cream cake is with stabilized whipped cream. While regular whipped cream is delicious, it tends to weep quickly as the cake sits at room temperature. Stabilized whipped cream holds its shape longer.
Many recipes use gelatin for stability, but I prefer using clear piping gel. It incorporates seamlessly into the cream without the risk of clumping, and it keeps the whipped cream soft, airy, and stable even after days in the freezer.
Whether you’re marking a milestone or simply gathering friends and family around the table, this Banana Coconut Ice Cream Cake is the kind of dessert summer memories are made of.
I made this recipe on Fox59!
Banana Coconut Ice Cream Cake
This homemade banana coconut ice cream cake features a genius no-melt pan trick for perfect layers. The ultimate stress-free summer party dessert!
- Total Time1 hour 5 minutes
- Yield12 servings 1x
Ingredients
For the cake layers
- 1 box yellow cake mix
- 1 (3.4-ounce) package instant banana pudding mix
- 3 large eggs
- 1 cup mashed ripe banana (about 2 large bananas)
- 1 cup buttermilk
- ½ cup vegetable oil
For the ice cream layer
- 1.5 quarts Hudsonville Toasted Coconut ice cream
For the stabilized whipped cream
- 1 cups heavy whipping cream
- 2 Tablespoons powdered sugar
- 2 Tablespoons clear piping gel
- 1 teaspoon vanilla extract
For the decorations (optional)
- 1/2 cup graham cracker crumbs
- 1/2 cup toasted coconut flakes
- 1/2 cup toasted macadamia nuts, chopped
Instructions
For the cake layers
- Preheat your oven to 350 degrees Fahrenheit.
- Grease and line two 8-inch cake pans with parchment paper.
- In large bowl, combine cake mix, banana pudding mix, eggs, mashed banana, buttermilk, and oil. Mix until smooth.
- Divide batter evenly between prepared pans and bake 30 to 40 minutes, or until top springs back and internal temperature registers between 200-210 degrees Fahrenheit.
- Cool 15 minutes in pans before flipping onto cooling rack to cool completely.
- Wrap each layer separately in plastic wrap and freeze at least 6 hours or overnight.
For the ice cream layer
- Line 8-inch cake pan with plastic wrap, leaving plenty of overhang on all sides.
- Allow Hudsonville Toasted Coconut ice cream to soften just enough to be spreadable. Transfer it to the prepared pan and smooth top into even layer.
- Cover with overhanging plastic wrap and freeze until completely firm, at least 6 hours or overnight.
For the stabilized whipped cream
- In cold mixing bowl, whip heavy cream, powdered sugar, piping gel, and vanilla on low speed until just foamy.
- Turn speed to medium-high and whip until medium-stiff peaks form.
- Keep refrigerated until ready to use.
For assembly
- Place one frozen cake layer on cake board set on serving platter that fits in your freezer.
- Spread thin layer of whipped cream over the cake layer.
- Remove ice cream layer from pan using plastic wrap and place it on top of cake. Peel away plastic wrap.
- Spread another thin layer of whipped cream over ice cream layer and top with second cake layer.
- Frost top and sides of cake with remaining whipped cream.
For decoration
- Sprinkle graham cracker crumbs, toasted coconut, and/or toasted macadamia nuts on top if desired.
- Freeze until ready to serve.
- Prep Time: 30 minutes
- Cook Time: 35 minutes
- Category: Dessert
- Cuisine: American