

This easy homemade focaccia is the same tried-and-true recipe I’ve been making since my early days of culinary school. There are two versions to give you the best of both worlds: a quick, same-day dough ready in two and a half hours, or a cold-fermented overnight dough for maximum flavor and an airy crumb. There’s no shaping, no scoring, no banneton, no Dutch oven. Just press it into a sheet pan with your fingers.

Same-Day vs. Overnight Focaccia: Which Method Should You Choose?
Same ingredients, same amounts, same pan, same bake. The only real difference is how long the dough ferments and where. Here’s how to pick.
Option 1: Same-Day Focaccia Dough (Ready in 2.5 Hours)
You mix the dough in the morning (or early afternoon), let it rise on the counter for about an hour, spread it into the pan, proof it for another 30–40 minutes, and bake. Start to finish, you’re looking at roughly 2 hours and 20 minutes.
Pros
- Bread on the table the same day with no advance planning.
- The dough is warm and relaxed, so it stretches into the pan easily.
- Fewer steps and fewer variables
Cons
- Less flavor development. A fast fermentation gives you a bread that tastes primarily of yeast, olive oil, and salt, which is lovely, but it’s a simpler flavor.
- The crumb is a little tighter and more even, with fewer of those big irregular holes.
- You’re tied to your kitchen for the entire window. You can’t pause a room-temperature rise.
- Slightly less blistering on the crust.
Option 2: Overnight Cold-Fermented Focaccia Dough (12–18 Hour Rise)
You mix the dough at night and then refrigerate it for 12–18 hours. The next day you spread it into the pan, let it come up to room temperature and proof for 2–3 hours, and bake.
Pros
- Significantly better flavor. A long, cold fermentation gives the yeast and enzymes time to break starches into sugars and produce the acids and aromatic compounds that make bread taste like bread.
- A more open, irregular crumb with bigger holes
- A crispier, more blistered crust
- The work is split across two days, and the active time on baking day is about five minutes.
- The fermentation window is generous. Anywhere from 12 to 18 hours works, so you’re not watching a clock.
Cons
- You have to plan a day ahead.
- It takes up real estate in your refrigerator overnight.
- Cold dough resists stretching. You have to spread it in stages with rest periods in between, or it’ll snap back on you.
- Baking day still takes 2–3 hours because of the final proof, so “overnight” doesn’t mean “instant” the next morning.
- Proofing time varies more with kitchen temperature. Judge by the dough, not the clock.
How to Pick the Best Baking Schedule for You
If it’s your first time, or if you decided you wanted focaccia sometime after lunch, make the same-day dough. It’s genuinely great bread.
If you have the foresight and you want to taste the difference between good focaccia and really good focaccia, make the overnight dough. It’s the version I generally make.

The Best Flour for Focaccia: Bread Flour vs. All-Purpose Flour
Why Bread Flour Yields the Best Texture and Open Crumb
I call for bread flour in this recipe for structural reasons.
Bread flour runs about 12–14% protein, while all-purpose sits closer to 10–11.7%. More protein means more gluten, and more gluten means a stronger, stretchier network of strands running through your dough.
That matters more for focaccia than for almost any other bread, for several reasons:
This is a wet dough. At 65% hydration, there’s a lot of water for the flour to hold onto. Bread flour absorbs more water than all-purpose does, so it can carry that hydration and still feel like dough rather than batter. A strong gluten network is what turns all that water into steam pockets and open crumb instead of a dense, gummy slab.
The dough has to hold its own weight and your toppings. Focaccia proofs in a pan and gets dimpled, oiled, and loaded with things. Weaker flour makes a weaker structure, and a weaker structure collapses under all of that.
Bread flour is also what gives focaccia that specific chew. That texture is gluten. Less gluten, less chew.
Also, go with unbleached bread flour if you can. Bleaching weakens protein slightly, and we want all of it.
How to Substitute All-Purpose Flour (And How to Adjust Hydration)
Yes. It will work, and it will still be good bread. I’d rather you make focaccia with the flour you have than not make focaccia at all.
Here’s what to expect:
- A softer, more tender crumb. Less chew, more give.
- A slacker, wetter dough. All-purpose can’t hold the same amount of water, so the dough will feel looser and stickier.
- Slightly less height and a less open interior. Weaker gluten holds less gas.
- When kneading, watch it closely and check your windowpane sooner. It’s easier to overwork a weaker dough.
One adjustment I’d make: hold back about 20 grams of the water (start with 330 grams instead of 350) and add it back only if the dough seems too stiff. That compensates for all-purpose flour’s lower absorption and keeps the dough manageable.
Flours You Should Avoid for Focaccia
I do not recommend homemade focaccia with cake flour, pastry flour, or self-rising flour. Cake and pastry flour don’t have nearly enough protein to build the structure this bread needs, and self-rising flour has baking powder and salt already in it, which will throw the whole recipe off.

Instant Yeast vs. Active Dry Yeast in Focaccia
Why Instant Yeast Offers the Best Results
Everyone seems to reach for active dry yeast at the grocery store, and I don’t understand it. I only use instant yeast. Why? Because you don’t have to worry about activating it or pre-dissolving it in water before it meets the rest of your ingredients. It also gets to work much faster than active dry.
How to Convert Active Dry Yeast for This Recipe
You can use active dry yeast interchangeably here, but you’ll need to proof it in water first (follow the directions on the package) and allow for about 15 extra minutes of rise time.
This article from King Arthur Baking does a good job explaining yeast if you have more questions.
Cold Fermentation and Yeast Activity Explained
I use the same amount of yeast for both dough methods. You’ll come across recipes that cut the yeast way back for an overnight rise, but I don’t think that’s necessary. The refrigerator already does that job. The cold slows yeast activity down dramatically, so 9 grams behaves like a completely different quantity at 38°F than it does on a warm counter.

Ideal Water Temperature for Focaccia Dough
Can you accurately define the degree for “tepid” or “lukewarm”? Me neither. It isn’t a precise temperature, which is why it confuses me when other recipes call for “lukewarm” water. And if you aren’t careful and your water is too warm, you can kill the yeast outright.
Why Room Temperature Water (70°F–72°F) Works Best
In my yeast breads class in culinary school, we learned a formula for determining accurate water temperature. It’s called the desired dough temperature formula. The ideal dough temperature is between 76°F and 78°F. Four factors affect it: air temperature, flour temperature, friction factor, and water temperature, and water temperature is usually the only one you can actually manipulate. You determine it by multiplying 76 by 3 and subtracting the air temperature, flour temperature, and friction factor.
Rather than bore you with more talk about desired dough temperature (learn more about it here), I’ll skip to the point: the optimal water temperature is almost always between 70°F and 72°F, which is about room temperature. That’s why the recipe just says “room temperature.”
Mixing Technique: Why Liquids Belong in the Bowl First
One more thing about the mixing bowl... If you read the recipe closely, you’ll notice I put the liquids in the bowl first, which isn’t typical of most recipes. I always do this when mixing bread, because a pocket of dry flour will get stuck in the dimple at the bottom of the bowl if you don’t add the liquid first.

How to Check Gluten Development (The Windowpane Test)
Proper gluten development determines how long you knead, and it’s the thing most home bakers guess at. So how do you know when the dough has developed enough?
Check for a windowpane. Dampen your fingers first, or the dough will stick to your hands. Pull off a small piece and gently stretch it between your fingers and thumbs. If you can stretch it thin enough to see light through it without it tearing, you’ve achieved proper gluten development. If it tears easily before you can stretch it, knead for about 2 more minutes on second speed and test again.
You can read more about the windowpane test here.

Best Focaccia Mix-Ins and Fold-In Ingredients
Anything you fold into the dough is protected by the dough itself, which means the inside is much more forgiving than the top. The heat is gentler, there’s moisture all around it, and nothing is directly exposed to the oven.
Recommended Mix-In Combinations
Great mix-ins:
- Hard aged cheeses: parmesan, pecorino, asiago, aged provolone
- Cubed low-moisture mozzarella, which melts into little molten pockets
- Small-diced white or yellow onion (raw is fine — it softens as it bakes)
- Caramelized or sautéed onion, cooled
- Roasted garlic cloves, smashed
- Pitted olives, halved and patted dry
- Sun-dried tomatoes, drained and blotted
- Roasted red peppers, blotted very dry
- Cooked and crumbled bacon, pancetta, or sausage
- Dried herbs, red pepper flakes, cracked black pepper, lemon zest
Three Essential Rules for Adding Mix-Ins Without Ruining the Rise
- Blot everything wet. Olives, sun-dried tomatoes, and roasted peppers carry a surprising amount of oil and water, and every bit of it goes straight into your hydration. Pat them dry with paper towels.
- Keep the total to about 20–25% of the flour weight. For this recipe, that’s roughly 110–135 grams of add-ins. More than that and the pieces physically interrupt the gluten network, and you lose your rise.
- Add them at the very end of mixing, after you’ve hit your windowpane. Mix just until distributed, maybe 30 seconds. Adding them early means grinding them into paste and shredding the gluten you just built.
Best Focaccia Toppings (and What Burns at 450°F)
This is where homemade focaccia becomes a canvas—it’s the whole reason focaccia art took off during the pandemic, with people recreating paintings in herbs and vegetables. But it’s also where most focaccia goes wrong, because the top of the loaf sits in direct 450°F heat for 20 minutes with nothing between it and the oven. Plenty of delicious ingredients simply cannot survive that.
Oven-Safe Toppings for High-Heat Baking
- Rosemary. The undisputed champion. Woody, oily, and nearly indestructible. Strip it into short sprigs.
- Thyme and sage. Both work, but they’re more delicate than rosemary—at 450°F, any leaf left sitting on the surface will darken. Coat them in oil and press them down into the dimples.
- Cherry or grape tomatoes, halved and pressed cut-side up into the dough. They concentrate and blister.
- Thinly sliced red onion or shallot, soaked in olive oil for about 10 minutes first. Any edge sticking straight up will darken, so press the slices flat.
- Whole or halved olives, pushed into the dimples so they don’t shrivel.
- Thin lemon slices, oiled well. They’ll caramelize and go slightly bitter in a way that’s genuinely good with salt and rosemary.
- Paper-thin potato slices, oiled and shingled. One of the best things you can put on homemade focaccia.
- Flaky sea salt. Always. Add it after the final drizzle of oil so it sticks.
Toppings That Burn (and What to Do Instead)
| Ingredient | What happens at 450°F | Do this instead |
|---|---|---|
| Raw minced or sliced garlic | Turns black and acrid in about 5 minutes. The worst offender by far, and there’s no saving it at this temperature. | Brush on garlic-infused olive oil, press roasted garlic into the dimples, or brush garlic butter on after baking. |
| Tender herbs — basil, parsley, cilantro, dill, chives, tarragon | Blacken into papery flecks and taste like ash, usually within the first few minutes | Scatter them on fresh after the bake, or bury them completely in the dough |
| Shredded or grated cheese | Goes from browned to bitter and dries into leathery strands | Add it during the last 4–5 minutes of baking, or mix it into the dough instead |
| Fresh mozzarella or burrata | Releases water and creates soggy craters | Tear it over the hot bread right out of the oven |
| Dried fruit — cranberries, raisins, figs | High sugar, so they scorch and harden into pebbles | Fold them into the dough |
| Prosciutto and thin cured meats | Turn to salty leather | Drape over the warm focaccia after baking |
| Pine nuts and walnuts | Their oils go rancid-bitter well before the bread is done | Add in the last 3–4 minutes, or toast separately and scatter after |
| Honey, balsamic glaze, sugary drizzles | Sugar starts burning within the first several minutes at this heat | Drizzle over the finished bread |
| Microgreens, edible flowers, delicate greens | Instant char | Garnish after baking |
Three Golden Rules for Preventing Burnt Toppings
- Coat everything in olive oil. Oil conducts heat evenly and shields delicate surfaces from dry oven air. A dry herb leaf burns; an oiled one crisps.
- Press toppings down into the dimples. The dimples aren’t just decorative—they’re little wells that pool oil and partially shelter whatever you put in them. Anything sitting proud on the surface is fully exposed.
- If it’s sugary, delicate, or watery, it goes on after the bake or in the last three or four minutes. At 450°F the margin for error is small. There’s no technique that saves basil from twenty minutes in the oven.
How to Store, Freeze, and Reheat Easy Homemade Focaccia
Homemade focaccia is at its absolute best within a few hours of coming out of the oven, when the bottom is still crisp. That said:
- Room temperature: Store cut-side down or in an airtight container for up to 2 days. Don’t refrigerate it. The fridge stales bread faster than the counter does.
- Freezer: Wrap tightly and freeze for up to 3 months. Slice it into portions before freezing so you can pull out what you need.
- Reheating: 350°F for 8–10 minutes, directly on the oven rack or on a sheet pan. A quick pass in a dry skillet, cut side down, will re-crisp a single slice.

Selecting the Best Olive Oil for Baking Focaccia
As you can see, olive oil is one of the key ingredients in homemade focaccia. But did you know not olive oil is created equally? Last year, I compiled everything you need to know to choose the best olive oil into this post. There is also a recipe for a bread dipping oil in the same post.
Print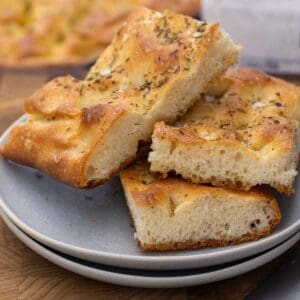
Easy Homemade Focaccia (Same-Day or Overnight)
A chewy, golden homemade focaccia that is crisp on the bottom, airy in the middle, and endlessly customizable. Choose the same-day method for fresh bread in about two and a half hours, or the overnight cold-fermented method for deeper flavor and more time flexibility.
- Total TimeRise Time: About 1 hour 40 minutes
- Yield15 Servings 1x
Ingredients
- 540 grams bread flour
- 10 grams kosher salt
- 9 grams instant yeast
- 350 grams water, room temperature (70–72°F)
- 35 grams olive oil, plus more for the pan, the dough, and finishing
- Flaky sea salt, for finishing
- Optional mix-ins (up to about 130 grams total): chopped olives, roasted garlic, sun-dried tomatoes, shredded parmesan
- Optional toppings: rosemary, dried herbs, cherry tomatoes, olives
Instructions
For the dough (both methods)
- Whisk the flour, kosher salt, and instant yeast together in a medium bowl. Set aside.
- Add the water and olive oil to the bowl of a stand mixer first, then add the flour mixture on top. Mix with a spatula until a shaggy dough forms and there is no more dry flour.
- Using the dough hook, knead on low speed for 5 minutes. Increase to medium speed and mix until you reach proper gluten development, about 2 more minutes. Test for a windowpane: with damp fingers, stretch a small piece of dough thin enough to see light through it without tearing. If it tears, knead 1 more minute on medium speed and test again.
- If using mix-ins, add them now and mix on low speed until evenly distributed, about 20 seconds.
Option 1: Same-day dough
- Place the dough in an oiled bowl, cover, and proof at room temperature until doubled in size, about 1 hour.
- Gently punch down the dough, round it, cover, and let it rest for 10 minutes so the gluten relaxes.
- Generously oil a half sheet pan. Transfer the dough and stretch it to evenly fill the pan. If it resists, let it rest 10 minutes and continue.
- Brush the top with olive oil, cover, and proof until doubled and visibly puffy, about 30–40 minutes. Continue to “Bake.”
Option 2: Overnight dough
- Place the dough in a large oiled bowl, cover, and place in the refrigerator. Cold-ferment for 12–18 hours. The dough should roughly double and look bubbly.
- Generously oil a half sheet pan. Turn the cold dough out into the pan and gently stretch it toward the corners. Stretch as far as it comfortably goes, rest 10 minutes, and stretch again.
- Repeat until it fills the pan, usually 2 to 3 rounds.
- Brush the top with olive oil, cover, and proof at room temperature until doubled and jiggly, about 2 to 3 hours depending on how warm your kitchen is. Continue to “Bake.”
Bake (both methods)
- Preheat the oven to 450°F.
- Oil your fingers and press straight down into the dough all over, all the way to the bottom of the pan, to create deep dimples.
- Drizzle generously with olive oil so it pools in the dimples.
- Add your toppings, pressing them down into the dimples so they’re partially shielded from the direct heat. Finish with flaky sea salt.
- Bake for 20 minutes, until the top is deep golden brown and the internal temperature reaches 200°F.
- Let cool in the pan for 10 minutes, then transfer to a wire rack. Serve warm.
Notes
- Use more oil than feels necessary, both in the pan and on top. The bottom of focaccia essentially shallow-fries in the pan, and that’s where the crisp comes from.
- If you must substitute all-purpose flour for bread flour: reduce the water to 330 grams and expect a softer, more tender, slightly less chewy crumb.
- Substituting active dry yeast: proof it in the water first per the package directions and allow about 15 extra minutes of rise time.
- Choosing your pan: For a thinner, crispier focaccia with more crust, bake it on an 18×13″ rimmed baking sheet as directed. This is what I use for sandwiches because so often when you order a focaccia sandwich it’s all bread, and the fillings get lost. For a thicker, fluffier focaccia, use a 13×9″ metal baking pan and add 5–10 minutes to the bake time. That version is excellent as a dinner bread.
- Prep Time: 20 minutes
- Cook Time: 20 minutes
- Category: Appetizer
- Method: Baking
- Cuisine: Italian
Nutrition
- Calories: 160
- Sodium: 250 mg
- Fat: 4 g
- Carbohydrates: 27 g
- Protein: 5 g